Takahashi FRC-300

Takahashi FRC-300
The new FRC-300 arrived on a clear day in June, 2006. The telescope carried a serial number of 06001. I guess that I am the first new owner of this magnificent flat field Ritchey-Chrétien this year. I had been using a Mead 14” LX200GPS, and while it was acceptable, it was not up to the same optical quality that I was getting from a Takahashi TOA-130. So I took a big risk and ordered the FRC-300. The most painful part of the entire process was the waiting time. The time between the initial order and deposit and the order delivery was seven months. The wait time might have been a couple of months shorter except that the original mirrors apparently failed a Takashi quality inspection/test. I am actually really happy that they found the problems as part of their high quality standards within their manufacturing processes. This is much better than letting me find the problems after delivery. As Art from TNR said, “Quality takes time.” I very much prefer Takahashi over other telescope manufactures because of their truly outstanding quality; it is just that I am short on patience.
I assumed that the 2348mm focal length at f/7.83 would make the FRC-300 an outstanding astrograph while still giving enough magnification to take good galaxy images. With its 300mm of aperture I expected good light gathering characteristics, even though I calculated that there would be about 25% area obstruction of the primary mirror from the spider apparatus. With all other OTA’s I had experienced heavy duty vignetting with my camera. Would the FCR-300 do better? The specs promised a large Ø90mm image circle. While I am primarily an astro-imager, I also wanted to be able to come to focus though an eye-piece.
Delivery and Setup
The long wait was finally over. Since this was not my first telescope, I knew that I wanted to proceed slowly and enjoy every moment of the new setup. The OTA itself arrived in a very large package with impressive Japanese language characters handwritten on the outside of the box. I promised myself that on Day-One I would only take the first step of removing the OTA from its shipping container. This took about 10 minutes, and now I had to wait again for Day-Two.
The FRC-300 was well packaged and protected for its long shipment from Japan. I was able to remove the OTA from the shipping container unassisted even though it weighs in at a hefty 66 lbs. Art and the guys at Texas Nautical Repair had done their thing. They had carefully inspected the shipment and inserted some optional accessories that I had ordered, including a collimating telescope for the OTA.
Day-2: At this point I had decided not to set artificial limits on how fast and how far I would go with the setup process. This didn’t work very well for me either. While I had wanted to take my time with the setup, I completed everything else that need to be done on Day-2. It was all too easy.
My primary goals for Day-2 were to mount the FRC-300 atop of the Paramount ME and achieve a balanced scope ready for use. I would place the FRC-300 onto a Casady M300 adapter plate which I had pre-ordered from Robin Casady. I also had ordered a Casady Tandem18 Bar. The Tandem18 slides easily into the VersaPlate of the ME. The FRC-300 ships with two tube rings which match the holes of the M300 plate. I also mounted my TeleVue NP101 at the other end of the tandem bar to use as a guide scope for imaging. Both the FRC-300 and the NP101 are attached to the Tandem18 with Casady saddles. I was a bit nervous about the balancing, but it too proceeded very easily given all the movement possibilities made possible by the Casady connections.
At this point some might advise me that there will be too much flexure in this tandem configuration. I had pre-tested this approach using the heavier Meade 14” and the NP101 without any problems. So I am proceeding this way with the Takahashi FRC-300. Each time that I have used guidance with this configuration, the FRC-300 and mount has worked very well averaging less than 0.4 pixels of combined corrected guidance error in X+Y.
Inside of 90 minutes everything was done and ready to have its picture taken:

Terrestrial Finder Alignment
I needed to slow down as this was all happening faster than plan. So I took a break. I had lunch, and I did some emails… and waited. I decided that I would use the collimating telescope and verified that factory delivered collimation was essentially perfect. It was, and it took about 15 minutes to do.
The time was now about 2pm on Day-2, so I decided that I shouldn’t wait (it might rain or something) and that I would roll-out of the garage. I do not have an observatory or a fixed platform. My environment is nightly moves from my garage to the end of my driveway. Here I setup and re-align every night.

Since it was still daylight, I had the opportunity to do a terrestrial alignment of the finder scope with the OTA. This would also be my first experience with the helical focuser on the FRC-300. I was not expecting this to be easy, and it was not. The Back-Focus distance of the FRC-300 with just the native corrector is only 105.70mm. As I had feared, I could not get a clear focus on a stop sign that was about 200 yards away even after having rotated the “captain’s wheel focuser” all the way. Fred at TNR had warned me that this scope was really an astrograph, and I would not be able to use my 2” oculars with it. However, I had purchased at Fred’s suggestion a Hutech diagonal. With just this little added focusing capability, I was able to see enough to get a 1st alignment adjustment for the finder scope. Good enough. I will leave the rest for closer alignment on the heavens using the camera. I really wouldn’t want to use the FRC-300 for much visual observation. The FRC-300 would work, but there are other better options at hand.
First Light
I took another break and some more pictures of the telescope, but I was giving-up with this go slow approach (maybe it would rain?). The time was mid-afternoon, and as I looked to the sky, I noticed a beautiful half moon just west of the meridian. I decided to take first light with the FRC-300 at about 3pm using the moon as a target. Having some prior negative experience with the proximity of prime focus between visual and CCD imaging, I decide to do everything with the camera even though it was still daylight. I had read other reviews about the experience of others with large Ritchey-Chrétien telescopes and without fail there were complaints and expressions of difficulty finding the initial focus position. I have an SBIG STL camera and I use a Finger Lakes Precision Digital Focuser (PDF). The PDF lets me achieve a very highly accurate focus position. The back end configuration is as follows when not using a focal reducer:
STL11000M>FLI-AD12>FLI-PDF>Precision Parts Custom (36.52mm)>FRC-300
As luck would have it, I was able to shorten the exposure time sufficiently to capture daytime images of the moon. Focusing with the big captain’s wheels was actually very easy. In fact it took only 10-15 minutes to get a crisp, good-enough-for-me first image of the moon. The time wasn’t even 4pm.


Imaging at Night
Finally sun-set arrived on Day-2. I took new flats and a few new dark images. After darkness arrived, I did a quick Paramount alignment followed by a full T-Point model run. After I made the final fine focusing adjustments using the PDF, I was ready for the real test… to see what the FRC-300 images would be like. This is the perfect telescope for me. I love its high quality optics and its sharp focus. As the temperature changes the FRC-300 has automatic temperature compensation so that precision focus is maintained. This works within a 5 degree temperature range, and to this point I have not need to use the similar capabilities within the PDF. I am far from an expert, and I have only enjoyed this hobby for 18 months. The images that I have taken are beyond my expectations. While some slight vignetting still remains on the big imaging chip of the STL, the vignetting is far less than before. I have only had the system in use a few times, as the weather is Florida has become seasonally rainy.
Below are a couple of new images from a beginner. You can also see more on my website at http://www.SchickWorld.com where I also discuss the various equipment comparisons in more detail. I hesitate to show my images as a positive testimonial for this magnificent telescope. I really am just a relative beginner, and I know that my images are often not as polished nor a good as those produced by others. I do not spend much effort making PhotoShop enhancements to my images, and I do not want to take-away from the truly outstanding capabilities of the FRC-300. I can only compare my new images with my own prior images made with the same mount and camera. The differences are striking and confirm my decision to buy from Takahashi.
Yes, it performs even better than I had expected. I get good galaxy magnification and with the same telescope I am able to see wide-fields for nebulas and clusters. I am a very happy camper.


Concerns
I wanted the FRC-300, because I do want to take great CCD images. The FRC-300 would not be my first choice however if I were doing primarily visual observations.
Here in Florida, we understand what it means to have moisture in the air. I have already observed some spots on my primary mirror. I use a dew heater, and I am as careful as possible, but this machine does not look like it will be routine or easy to clean.
Conclusion
The 7 month wait for production and delivery was painful. Maybe I am impatient or something. However, the FRC-300 was absolutely worth the wait. I only look forward to many years of fun in the dark with this beautiful, high quality telescope.
Mel Schick
June 20, 2006
Click here for more about this subject. -Ed.
The new FRC-300 arrived on a clear day in June, 2006. The telescope carried a serial number of 06001. I guess that I am the first new owner of this magnificent flat field Ritchey-Chrétien this year. I had been using a Mead 14” LX200GPS, and while it was acceptable, it was not up to the same optical quality that I was getting from a Takahashi TOA-130. So I took a big risk and ordered the FRC-300. The most painful part of the entire process was the waiting time. The time between the initial order and deposit and the order delivery was seven months. The wait time might have been a couple of months shorter except that the original mirrors apparently failed a Takashi quality inspection/test. I am actually really happy that they found the problems as part of their high quality standards within their manufacturing processes. This is much better than letting me find the problems after delivery. As Art from TNR said, “Quality takes time.” I very much prefer Takahashi over other telescope manufactures because of their truly outstanding quality; it is just that I am short on patience.
I assumed that the 2348mm focal length at f/7.83 would make the FRC-300 an outstanding astrograph while still giving enough magnification to take good galaxy images. With its 300mm of aperture I expected good light gathering characteristics, even though I calculated that there would be about 25% area obstruction of the primary mirror from the spider apparatus. With all other OTA’s I had experienced heavy duty vignetting with my camera. Would the FCR-300 do better? The specs promised a large Ø90mm image circle. While I am primarily an astro-imager, I also wanted to be able to come to focus though an eye-piece.
Delivery and Setup
The long wait was finally over. Since this was not my first telescope, I knew that I wanted to proceed slowly and enjoy every moment of the new setup. The OTA itself arrived in a very large package with impressive Japanese language characters handwritten on the outside of the box. I promised myself that on Day-One I would only take the first step of removing the OTA from its shipping container. This took about 10 minutes, and now I had to wait again for Day-Two.
The FRC-300 was well packaged and protected for its long shipment from Japan. I was able to remove the OTA from the shipping container unassisted even though it weighs in at a hefty 66 lbs. Art and the guys at Texas Nautical Repair had done their thing. They had carefully inspected the shipment and inserted some optional accessories that I had ordered, including a collimating telescope for the OTA.
Day-2: At this point I had decided not to set artificial limits on how fast and how far I would go with the setup process. This didn’t work very well for me either. While I had wanted to take my time with the setup, I completed everything else that need to be done on Day-2. It was all too easy.
My primary goals for Day-2 were to mount the FRC-300 atop of the Paramount ME and achieve a balanced scope ready for use. I would place the FRC-300 onto a Casady M300 adapter plate which I had pre-ordered from Robin Casady. I also had ordered a Casady Tandem18 Bar. The Tandem18 slides easily into the VersaPlate of the ME. The FRC-300 ships with two tube rings which match the holes of the M300 plate. I also mounted my TeleVue NP101 at the other end of the tandem bar to use as a guide scope for imaging. Both the FRC-300 and the NP101 are attached to the Tandem18 with Casady saddles. I was a bit nervous about the balancing, but it too proceeded very easily given all the movement possibilities made possible by the Casady connections.
At this point some might advise me that there will be too much flexure in this tandem configuration. I had pre-tested this approach using the heavier Meade 14” and the NP101 without any problems. So I am proceeding this way with the Takahashi FRC-300. Each time that I have used guidance with this configuration, the FRC-300 and mount has worked very well averaging less than 0.4 pixels of combined corrected guidance error in X+Y.
Inside of 90 minutes everything was done and ready to have its picture taken:
Terrestrial Finder Alignment
I needed to slow down as this was all happening faster than plan. So I took a break. I had lunch, and I did some emails… and waited. I decided that I would use the collimating telescope and verified that factory delivered collimation was essentially perfect. It was, and it took about 15 minutes to do.
The time was now about 2pm on Day-2, so I decided that I shouldn’t wait (it might rain or something) and that I would roll-out of the garage. I do not have an observatory or a fixed platform. My environment is nightly moves from my garage to the end of my driveway. Here I setup and re-align every night.
Since it was still daylight, I had the opportunity to do a terrestrial alignment of the finder scope with the OTA. This would also be my first experience with the helical focuser on the FRC-300. I was not expecting this to be easy, and it was not. The Back-Focus distance of the FRC-300 with just the native corrector is only 105.70mm. As I had feared, I could not get a clear focus on a stop sign that was about 200 yards away even after having rotated the “captain’s wheel focuser” all the way. Fred at TNR had warned me that this scope was really an astrograph, and I would not be able to use my 2” oculars with it. However, I had purchased at Fred’s suggestion a Hutech diagonal. With just this little added focusing capability, I was able to see enough to get a 1st alignment adjustment for the finder scope. Good enough. I will leave the rest for closer alignment on the heavens using the camera. I really wouldn’t want to use the FRC-300 for much visual observation. The FRC-300 would work, but there are other better options at hand.
First Light
I took another break and some more pictures of the telescope, but I was giving-up with this go slow approach (maybe it would rain?). The time was mid-afternoon, and as I looked to the sky, I noticed a beautiful half moon just west of the meridian. I decided to take first light with the FRC-300 at about 3pm using the moon as a target. Having some prior negative experience with the proximity of prime focus between visual and CCD imaging, I decide to do everything with the camera even though it was still daylight. I had read other reviews about the experience of others with large Ritchey-Chrétien telescopes and without fail there were complaints and expressions of difficulty finding the initial focus position. I have an SBIG STL camera and I use a Finger Lakes Precision Digital Focuser (PDF). The PDF lets me achieve a very highly accurate focus position. The back end configuration is as follows when not using a focal reducer:
STL11000M>FLI-AD12>FLI-PDF>Precision Parts Custom (36.52mm)>FRC-300
As luck would have it, I was able to shorten the exposure time sufficiently to capture daytime images of the moon. Focusing with the big captain’s wheels was actually very easy. In fact it took only 10-15 minutes to get a crisp, good-enough-for-me first image of the moon. The time wasn’t even 4pm.
Imaging at Night
Finally sun-set arrived on Day-2. I took new flats and a few new dark images. After darkness arrived, I did a quick Paramount alignment followed by a full T-Point model run. After I made the final fine focusing adjustments using the PDF, I was ready for the real test… to see what the FRC-300 images would be like. This is the perfect telescope for me. I love its high quality optics and its sharp focus. As the temperature changes the FRC-300 has automatic temperature compensation so that precision focus is maintained. This works within a 5 degree temperature range, and to this point I have not need to use the similar capabilities within the PDF. I am far from an expert, and I have only enjoyed this hobby for 18 months. The images that I have taken are beyond my expectations. While some slight vignetting still remains on the big imaging chip of the STL, the vignetting is far less than before. I have only had the system in use a few times, as the weather is Florida has become seasonally rainy.
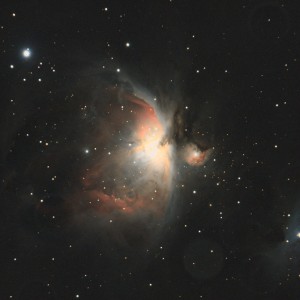
Below are a couple of new images from a beginner. You can also see more on my website at http://www.SchickWorld.com where I also discuss the various equipment comparisons in more detail. I hesitate to show my images as a positive testimonial for this magnificent telescope. I really am just a relative beginner, and I know that my images are often not as polished nor a good as those produced by others. I do not spend much effort making PhotoShop enhancements to my images, and I do not want to take-away from the truly outstanding capabilities of the FRC-300. I can only compare my new images with my own prior images made with the same mount and camera. The differences are striking and confirm my decision to buy from Takahashi.
Yes, it performs even better than I had expected. I get good galaxy magnification and with the same telescope I am able to see wide-fields for nebulas and clusters. I am a very happy camper.
Concerns
I wanted the FRC-300, because I do want to take great CCD images. The FRC-300 would not be my first choice however if I were doing primarily visual observations.
Here in Florida, we understand what it means to have moisture in the air. I have already observed some spots on my primary mirror. I use a dew heater, and I am as careful as possible, but this machine does not look like it will be routine or easy to clean.
Conclusion
The 7 month wait for production and delivery was painful. Maybe I am impatient or something. However, the FRC-300 was absolutely worth the wait. I only look forward to many years of fun in the dark with this beautiful, high quality telescope.
Mel Schick
June 20, 2006
Click here for more about this subject. -Ed.
Funding Member