Reviews & Articles
Image of the day

About Astromart
My Account
New to Astromart?
Register an account...Need Help?
The Volkswagen Beetle of Telescopes
STELLARVUE NIGHTHAWK, THE VOLKSWAGEN BEETLE OF TELESCOPES
I guess I could call it the “reverse curse.” Every time I purchase a telescope or accessory, I get a few clear nights to enjoy my new acquisition. Such was the case when I took delivery of my new Nighthawk II. I also got the chance to evaluate the performance of the Stellarvue binoviewer on this telescope, so I will include the binoviewer in this review as well. This time of the year, I do very little deep space observation (galaxies, nebulae, etc.) so I will limit my review to observations of the Moon, planets, and double stars.
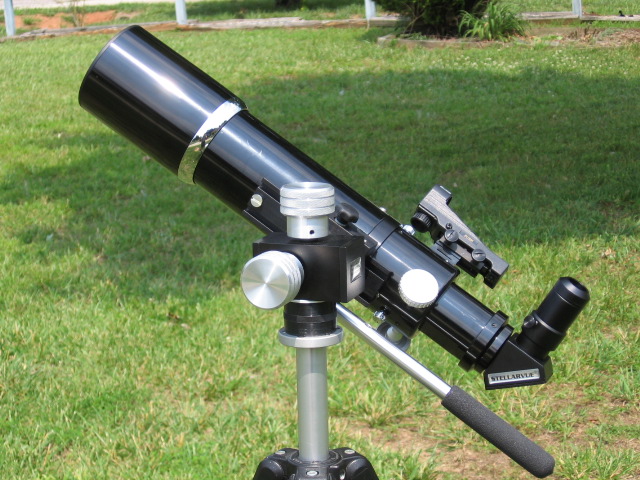
First sight: The Nighthawk II is an 80mm f/6 doublet achromat. It arrived in excellent condition. The base package includes a red dot finder and vinyl padded carrying case. It may have a similar appearance to many brands of imported mass-produced telescopes, but this bird is truly different. Other than a few parts that Stellarvue does not make, like the focuser or the red dot finder, the telescope is a genuine American product manufactured in California, including the Stellarvue proprietary lens. The optical tube is very well baffled and the telescope operates at full 80mm aperture, that is, neither the baffles nor the focuser tube intrudes into the light cone reducing the image brightness which has been a problem not uncommon with some imported telescopes. There are no mounting rings, but the Nighthawk II has a 6 inch dovetail bar installed that accommodates a number of mounting options. There are ¼-20 holes tapped in several places for mounting on a traditional photo tripod, or it can be mounted on a number of quality alt-az or equatorial mounts with a 2 inch jaw. In addition, the dovetail bar can be removed if the owner wishes to use traditional mounting rings, but at 5-1/2 pounds, the telescope with its dovetail bar works on a number of different mounts with few issues. There is ample room in the foam padded carrying case to add your accessories. The Nighthawk has a sliding metal dew shield that stays in place when extended. The metal cover is lightweight and is not threaded, but it is lined with felt so that it too stays in place when installed. My Nighthawk came with an import single speed Crayford focuser. The focuser is very smooth and is easily adjusted with the supplied allen wrench. I had only one out-of-the-box issue: the red dot finder did not work. With a quick call to Stellarvue, a polite lady asked me a few questions to make sure I had done the proper installation, and gave me a return goods authorization for replacement. Fortunately, I had a Stellarvue RDF from another telescope that I could use in the meantime.
I purchased the Stellarvue binoviewer with a telescope package last year. The Nighthawk II is not “bino-ready,” so I need to use the oca (optical correction adapter) which comes with the binoviewer package. (There is a bino-ready version, the Nighthawk BV, but it has a longer focal length and I wanted the wider field of the short-tube Nighthawk II.) I took the RDF off of my other scope and put it on the Nighthawk. With the telescope mounted on my Stellarvue M1 mount and Bogen tripod, I carried the entire system out and I was ready to go. The first thing to do is to turn on the RDF and align it. Oh good, it’s already on. Oh no! It’s already on! After replacing the dead battery, I was again good to go. The RDF aligned without any problem. It needed no additional shimming, and its mounting block was solid and held the RDF steady. It’s little things like that which makes one’s first experiences enjoyable.
I won’t say much about the star tests I did (other than that I get perfectly formed diffraction rings well separated by dark zones), for two reasons. First, I have to admit I know little about star-testing (other than to say that I get perfectly formed diffraction rings well separated by dark zones.) Second, Stellarvue guarantees perfectly aligned optics free from astigmatism and coma, even with this, their lowest priced 80mm telescope. They accomplish this by hand-matching and aligning the optics, and finishing the procedure with a professional star-test. That is, the owner of Stellarvue actually takes your telescope outside at night and looks though it, to verify that his staff did their job. That’s good enough for me to say that my telescope is, for an 80mm short tube achromat in its price range, the best that it can be.
Now for my first light experience: I own two doublet apochromatic telescopes, and I am definitely an apo-holic. So yes, the false color around the Moon bugged me at first. It is almost imperceptible at low powers, and the lunar view is very nice. But the more power you use the more violet color you see around the lunar limb. In fact, I can see the color very subtly across the surface of the Moon, but I really only noticed this with a side-by-side comparison with my apo. Still, I was very impressed at how well this telescope resolved the lunar surface. In later observing sessions I did not have any trouble seeing mountain peaks on the lunar limb, around Mare Humboldtianum or Orientale for example, with powers even as low as 24x. On the evening of May 2nd (my first light), Rheita Valley was pretty. The Nighthawk showed excellent contrast. One wall was lit up brightly and the valley itself had a deep rich blackness to it. Fact is, with my 13mm Nagler or 10mm Radian, I see more off-axis lateral color from the eyepiece than I do fringe color from the telescope.
I put in the SV binoviewer with the stock SV23mm eyepieces that come with the bino kit. Since the oca is a 2x magnifier allowing you to reach focus, I get 42x with these eyepieces. I still saw purple fringe, but now I didn’t care! Sharpness, detail, and contrast were remarkably improved. The Moon filled the field of view with plenty of room to spare. The lunar limb was very sharp. I could resolve numerous tiny craters around the crater Petavius. The Palitzsch and Snellius Vallis were easily resolved. The Stellarvue FMC 15mm pair gives 64x in the binoviewer. On the night of June 5th, with a 9.3 day old Moon and the terminator just past Copernicus, these eyepieces showed the ghost crater Stadium as well as resolving most of the Stadium craterlets to the east of Copernicus. Catina Müller could be resolved at 64x. Catina Davy Y could easily be seen, but not resolved into its craterlets. The Stellarvue 23 and 15mm eyepieces are not Naglers, but they are very sharp and have excellent color and contrast. They exhibit a bit of flare and lateral color, but not nearly enough to inhibit your view of the Moon. Both eyepieces have ample eye relief for eye glass wearers. Sharpness is excellent up to the last 10-15% of the field of view. Thereafter, they show only a minor drop-off in sharpness.
Now, with his “hemi” installed, I sent my Nighthawk on a star-splitting rampage. I put in the 15mm pair and easily split Castor at 68x. It was a lovely clean separation with perfectly formed airy discs, no distortions, spikes or bumps. Their white dwarf companion was also easily seen. While Castor is a 3.1 arc second separation, Izar is a bit tougher at 2.8”. I have a pair of 9mm BO/TMB planetary eyepieces and this provided a clean split of Izar at 106x. But the most fun was when I put in the SV15mm pair (68x). When the air was steady, I could easily see the pale blue secondary as a “wart” on the brighter, orange primary. It was fascinating to see these two stars looking like miss-matched marbles glued together. The double star Epsilon Hydrae is 2.9” of separation, but its secondary is three magnitudes dimmer than the primary. I had no luck splitting this star with the binos, so I used a 6mm ortho in mono mode and a 2x Barlow for 160x to get “hydrated.” Again, even at this high power the stellar airy discs exhibited no unevenness, spikes, or lumps. With the 6mm ortho at 80x I got an easy split of the 10th magnitude pair (HIP 48635) near the M81/82 galaxy pair. This was a very satisfying first light (and it wasn’t over yet!) Another demonstration of my new Nighthawk’s performance came several weeks later, when Epsilon Lyrae, the “Double-Double,” was high in the sky in the early morning hours. With the SV15mm in the binos for 68x, I got a clean split of Epsilon-1. Epsilon-2, with its brighter components, had a dumbbell appearance. (Angular separations are currently listed at 2.6” and 2.4” respectively.)
Now back to my first night: my Nighthawk was now hungry for planets. By May 2nd, Saturn was getting a bit low in the sky. Switching back to mono-mode, I put in my Meade 5.5mm 5000 series plossl for 88x. The Cassini Division, C-ring, and Equatorial Band were visible. The Cassini Division was visible at the ends of the rings, the C-ring visible as it crossed the planet. No false color could be seen. The disc showed a slightly darker color overall than the rings. Looking back over my shoulder, I saw that Jupiter had cleared the tree line. At 88x Jupiter showed a very tiny bit of fringe color, but luck was on my side and seeing steadied out. Jupiter’s limb became razor sharp. At 120x I counted nine belts and zones on the disc. The Equatorial Band itself was very dark and contrasty: I could easily make out two large white oval-shaped areas floating just below the North Equatorial Belt, and possibly a third. I do not wish to convey that this is some kind of miracle scope. This is an 80mm achromat and its resolution is not nearly that of my 102mm doublet apo. But at 120x I could easily see how the clouds in the NEB were being washed downward into the Equatorial Band. Also, I could see the South Temperate Belt where “Red Junior” resides. (Red Jr. was not visible that night, but I did catch a few glimpses of it with the ‘hawk during an unusually rewarding viewing session later that month.) I could easily see the zones above and below the STeB, making it a distinct and separate feature from the rest of the south polar area. This telescope also performed well on moon transits. The very next night, May 3rd, I carried it out to the street to get a good vantage point on Jupiter, and at 120x I was able to follow Ganymede and its shadow through the entire transit. I was treated to the Great Red Spot as an added bonus. On the evening of the 27th, I was able to follow Europa for about 15 minutes past ingress, until the seeing went south and I lost it in our own swirling atmosphere overhead. Finally, on the evening of June 7th, the waning daylight and the waxing gibbous Moon nearby prevented me from seeing Io, but with the binoviewers I could see its tiny shadow completing at least the shadow portion of the “transit triple crown.” (Io, we shall meet again!)
The binoviewers sound like a panacea, but they do have a few issues that the new user has to deal with. Some people find merging the images difficult. I myself had to go through “bino boot camp” by setting up outside in the daytime, so that I could relax and practice merging and focusing on stationary objects like trees. After a few days I got the hang of it and now I can merge with powers up to 175x with the Stellarvue binoviewers (although with a larger telescope.) The second issue is balancing the telescope. The binos make the Nighthawk II rear end heavy, and this makes operation near zenith very difficult, nearly impossible if you have your ‘hawk mounted on a photo tripod head. The Stellarvue 15mm eyepiece weighs 130 grams, and with these eyepieces I can just balance the scope on the Stellarvue M1 alt-az mount by pushing the scope as far up as it will go in the 2” jaw and still be held in securely. When choosing eyepiece pairs for this telescope, you definitely have to take weight into consideration, 130 grams being about the heaviest eyepiece that will work well IMO. To be fair, the Nighthawk II is not originally designed to be used with the binos. The best option is to purchase the Nighthawk BV, and balance will no longer be a problem. I chose the Nighthawk II over the BV though because I wanted to take advantage of the Nighthawk II’s 5º maximum field of view using 2” eyepieces in mono mode. (I am not sure, but the balancing act may be much easier for owners of the original Nighthawk Classic, as this model sports a much heavier dew shield which should better counter-balance the binos.)
The Stellarvue binoviewers have definite advantages that make them worth using. If you take the time to carefully merge and focus your images, there is less eyestrain using both eyes and the image will be sharper and with more contrast. Also, the apparent image size is larger in bino mode than it is in mono mode for the same power. This is an optical illusion, like the “big moon on the horizon” effect, but if your brain thinks it’s bigger, than it’s bigger. I estimate that I can see as much detail using 25-30% less power in bino mode. Then there is the “pseudo-3D” effect: the Moon really does appear 3-D through the binos, especially along the terminator. It would not be correct to say that these binoviewers “are as good as” a brand like Televue. But each binoviewer is individually collimated and the helical eyepiece focusers are precision machined at the Auburn facility to .001 tolerance. This makes the Stellarvue binoviewers much easier to merge and focus than other $199 brands. Basically, I can sum it all up in one sentence: IMHO the Stellarvue binoviewer is one of the best accessories you can buy that will improve the visual performance of your telescope.
The Nighthawk II is not without its own issues. First, this telescope has optics much better than your typical “Wal-Mart Wonder,” and it is priced accordingly. I do not consider this telescope overpriced, but you are going to have to cough up several more Big Bens to claim ownership of this bird. The second issue for me is the ergonomics at the focuser end. The telescope does scores points for excellent fit and finish. The supplied 2” to 1-1/4” adapter, for example, has a tapered barrel so that when you tighten down on the compression ring, it is pulled perfectly flush with the telescope thereby keeping perfect alignment. But I really feel that the screws and knobs at the focuser end are a bit cramped. The set screw for the rotating back, for example, sits directly under the RDF. Third, this telescope is an achromat, and will show color fringing around bright objects. Saturn showed no fringing that I could detect. Jupiter begins to show some fringing, as well as Venus and bright stars like Vega in Lyra. The lunar limb definitely displays false color. Users of mirror optics and apochromats may consider this a “crime of violets,” but in my opinion the excellent sharpness and total lack of astigmatism give you a dead-on focus, and this more than makes up for the achro-sitis.
Here is a list of equipment used in this review:
Stellarvue Nighthawk II
Stellarvue Binoviewer
Bogen 3001 tripod with 3130 photo head
Stellarvue M1 standard alt-az mount on Bogen 3011 tripod
Eyepieces for binoviewer:
Stellarvue FMC 23mm eyepieces (comes standard with binoviewer above)
Stellarvue FMC 15mm eyepieces
BO/TMB 9mm planetary eyepieces
Eyepieces for mono mode:
Meade 5.5mm 5000 series Plossl
BO/TMB 4mm planetary eyepiece
6mm Orthoscopic
2x Barlow
Filters: none used in this review
Conclusion: There are many fine telescope systems in the $500-1000 price range. But with some systems, you are putting most of your money into the hardware: motorized mount, goto computer, tripod, software, etc. With the Nighthawk, you are putting your money into the quality of the optical tube and the optics. I am not claiming that any of my observing accomplishments noted above are ready for the Guinness Book of World Records, but it is clear to me that the NHII has excellent performance. The Nighthawk can certainly speak for itself. In spite of all the “apo” hype currently out there, sales of this achromat, with its Stellarvue-designed lens remaining the same, continue at a brisk pace as they have for nearly ten years, which is why I call it the “Volkswagen Beetle of telescopes.” This is a telescope that will satisfy the experienced observer as well as the beginner.

David Elosser
Kernersville, NC
Click here for more about this subject. -Ed.
I guess I could call it the “reverse curse.” Every time I purchase a telescope or accessory, I get a few clear nights to enjoy my new acquisition. Such was the case when I took delivery of my new Nighthawk II. I also got the chance to evaluate the performance of the Stellarvue binoviewer on this telescope, so I will include the binoviewer in this review as well. This time of the year, I do very little deep space observation (galaxies, nebulae, etc.) so I will limit my review to observations of the Moon, planets, and double stars.
First sight: The Nighthawk II is an 80mm f/6 doublet achromat. It arrived in excellent condition. The base package includes a red dot finder and vinyl padded carrying case. It may have a similar appearance to many brands of imported mass-produced telescopes, but this bird is truly different. Other than a few parts that Stellarvue does not make, like the focuser or the red dot finder, the telescope is a genuine American product manufactured in California, including the Stellarvue proprietary lens. The optical tube is very well baffled and the telescope operates at full 80mm aperture, that is, neither the baffles nor the focuser tube intrudes into the light cone reducing the image brightness which has been a problem not uncommon with some imported telescopes. There are no mounting rings, but the Nighthawk II has a 6 inch dovetail bar installed that accommodates a number of mounting options. There are ¼-20 holes tapped in several places for mounting on a traditional photo tripod, or it can be mounted on a number of quality alt-az or equatorial mounts with a 2 inch jaw. In addition, the dovetail bar can be removed if the owner wishes to use traditional mounting rings, but at 5-1/2 pounds, the telescope with its dovetail bar works on a number of different mounts with few issues. There is ample room in the foam padded carrying case to add your accessories. The Nighthawk has a sliding metal dew shield that stays in place when extended. The metal cover is lightweight and is not threaded, but it is lined with felt so that it too stays in place when installed. My Nighthawk came with an import single speed Crayford focuser. The focuser is very smooth and is easily adjusted with the supplied allen wrench. I had only one out-of-the-box issue: the red dot finder did not work. With a quick call to Stellarvue, a polite lady asked me a few questions to make sure I had done the proper installation, and gave me a return goods authorization for replacement. Fortunately, I had a Stellarvue RDF from another telescope that I could use in the meantime.
I purchased the Stellarvue binoviewer with a telescope package last year. The Nighthawk II is not “bino-ready,” so I need to use the oca (optical correction adapter) which comes with the binoviewer package. (There is a bino-ready version, the Nighthawk BV, but it has a longer focal length and I wanted the wider field of the short-tube Nighthawk II.) I took the RDF off of my other scope and put it on the Nighthawk. With the telescope mounted on my Stellarvue M1 mount and Bogen tripod, I carried the entire system out and I was ready to go. The first thing to do is to turn on the RDF and align it. Oh good, it’s already on. Oh no! It’s already on! After replacing the dead battery, I was again good to go. The RDF aligned without any problem. It needed no additional shimming, and its mounting block was solid and held the RDF steady. It’s little things like that which makes one’s first experiences enjoyable.
I won’t say much about the star tests I did (other than that I get perfectly formed diffraction rings well separated by dark zones), for two reasons. First, I have to admit I know little about star-testing (other than to say that I get perfectly formed diffraction rings well separated by dark zones.) Second, Stellarvue guarantees perfectly aligned optics free from astigmatism and coma, even with this, their lowest priced 80mm telescope. They accomplish this by hand-matching and aligning the optics, and finishing the procedure with a professional star-test. That is, the owner of Stellarvue actually takes your telescope outside at night and looks though it, to verify that his staff did their job. That’s good enough for me to say that my telescope is, for an 80mm short tube achromat in its price range, the best that it can be.
Now for my first light experience: I own two doublet apochromatic telescopes, and I am definitely an apo-holic. So yes, the false color around the Moon bugged me at first. It is almost imperceptible at low powers, and the lunar view is very nice. But the more power you use the more violet color you see around the lunar limb. In fact, I can see the color very subtly across the surface of the Moon, but I really only noticed this with a side-by-side comparison with my apo. Still, I was very impressed at how well this telescope resolved the lunar surface. In later observing sessions I did not have any trouble seeing mountain peaks on the lunar limb, around Mare Humboldtianum or Orientale for example, with powers even as low as 24x. On the evening of May 2nd (my first light), Rheita Valley was pretty. The Nighthawk showed excellent contrast. One wall was lit up brightly and the valley itself had a deep rich blackness to it. Fact is, with my 13mm Nagler or 10mm Radian, I see more off-axis lateral color from the eyepiece than I do fringe color from the telescope.
I put in the SV binoviewer with the stock SV23mm eyepieces that come with the bino kit. Since the oca is a 2x magnifier allowing you to reach focus, I get 42x with these eyepieces. I still saw purple fringe, but now I didn’t care! Sharpness, detail, and contrast were remarkably improved. The Moon filled the field of view with plenty of room to spare. The lunar limb was very sharp. I could resolve numerous tiny craters around the crater Petavius. The Palitzsch and Snellius Vallis were easily resolved. The Stellarvue FMC 15mm pair gives 64x in the binoviewer. On the night of June 5th, with a 9.3 day old Moon and the terminator just past Copernicus, these eyepieces showed the ghost crater Stadium as well as resolving most of the Stadium craterlets to the east of Copernicus. Catina Müller could be resolved at 64x. Catina Davy Y could easily be seen, but not resolved into its craterlets. The Stellarvue 23 and 15mm eyepieces are not Naglers, but they are very sharp and have excellent color and contrast. They exhibit a bit of flare and lateral color, but not nearly enough to inhibit your view of the Moon. Both eyepieces have ample eye relief for eye glass wearers. Sharpness is excellent up to the last 10-15% of the field of view. Thereafter, they show only a minor drop-off in sharpness.
Now, with his “hemi” installed, I sent my Nighthawk on a star-splitting rampage. I put in the 15mm pair and easily split Castor at 68x. It was a lovely clean separation with perfectly formed airy discs, no distortions, spikes or bumps. Their white dwarf companion was also easily seen. While Castor is a 3.1 arc second separation, Izar is a bit tougher at 2.8”. I have a pair of 9mm BO/TMB planetary eyepieces and this provided a clean split of Izar at 106x. But the most fun was when I put in the SV15mm pair (68x). When the air was steady, I could easily see the pale blue secondary as a “wart” on the brighter, orange primary. It was fascinating to see these two stars looking like miss-matched marbles glued together. The double star Epsilon Hydrae is 2.9” of separation, but its secondary is three magnitudes dimmer than the primary. I had no luck splitting this star with the binos, so I used a 6mm ortho in mono mode and a 2x Barlow for 160x to get “hydrated.” Again, even at this high power the stellar airy discs exhibited no unevenness, spikes, or lumps. With the 6mm ortho at 80x I got an easy split of the 10th magnitude pair (HIP 48635) near the M81/82 galaxy pair. This was a very satisfying first light (and it wasn’t over yet!) Another demonstration of my new Nighthawk’s performance came several weeks later, when Epsilon Lyrae, the “Double-Double,” was high in the sky in the early morning hours. With the SV15mm in the binos for 68x, I got a clean split of Epsilon-1. Epsilon-2, with its brighter components, had a dumbbell appearance. (Angular separations are currently listed at 2.6” and 2.4” respectively.)
Now back to my first night: my Nighthawk was now hungry for planets. By May 2nd, Saturn was getting a bit low in the sky. Switching back to mono-mode, I put in my Meade 5.5mm 5000 series plossl for 88x. The Cassini Division, C-ring, and Equatorial Band were visible. The Cassini Division was visible at the ends of the rings, the C-ring visible as it crossed the planet. No false color could be seen. The disc showed a slightly darker color overall than the rings. Looking back over my shoulder, I saw that Jupiter had cleared the tree line. At 88x Jupiter showed a very tiny bit of fringe color, but luck was on my side and seeing steadied out. Jupiter’s limb became razor sharp. At 120x I counted nine belts and zones on the disc. The Equatorial Band itself was very dark and contrasty: I could easily make out two large white oval-shaped areas floating just below the North Equatorial Belt, and possibly a third. I do not wish to convey that this is some kind of miracle scope. This is an 80mm achromat and its resolution is not nearly that of my 102mm doublet apo. But at 120x I could easily see how the clouds in the NEB were being washed downward into the Equatorial Band. Also, I could see the South Temperate Belt where “Red Junior” resides. (Red Jr. was not visible that night, but I did catch a few glimpses of it with the ‘hawk during an unusually rewarding viewing session later that month.) I could easily see the zones above and below the STeB, making it a distinct and separate feature from the rest of the south polar area. This telescope also performed well on moon transits. The very next night, May 3rd, I carried it out to the street to get a good vantage point on Jupiter, and at 120x I was able to follow Ganymede and its shadow through the entire transit. I was treated to the Great Red Spot as an added bonus. On the evening of the 27th, I was able to follow Europa for about 15 minutes past ingress, until the seeing went south and I lost it in our own swirling atmosphere overhead. Finally, on the evening of June 7th, the waning daylight and the waxing gibbous Moon nearby prevented me from seeing Io, but with the binoviewers I could see its tiny shadow completing at least the shadow portion of the “transit triple crown.” (Io, we shall meet again!)
The binoviewers sound like a panacea, but they do have a few issues that the new user has to deal with. Some people find merging the images difficult. I myself had to go through “bino boot camp” by setting up outside in the daytime, so that I could relax and practice merging and focusing on stationary objects like trees. After a few days I got the hang of it and now I can merge with powers up to 175x with the Stellarvue binoviewers (although with a larger telescope.) The second issue is balancing the telescope. The binos make the Nighthawk II rear end heavy, and this makes operation near zenith very difficult, nearly impossible if you have your ‘hawk mounted on a photo tripod head. The Stellarvue 15mm eyepiece weighs 130 grams, and with these eyepieces I can just balance the scope on the Stellarvue M1 alt-az mount by pushing the scope as far up as it will go in the 2” jaw and still be held in securely. When choosing eyepiece pairs for this telescope, you definitely have to take weight into consideration, 130 grams being about the heaviest eyepiece that will work well IMO. To be fair, the Nighthawk II is not originally designed to be used with the binos. The best option is to purchase the Nighthawk BV, and balance will no longer be a problem. I chose the Nighthawk II over the BV though because I wanted to take advantage of the Nighthawk II’s 5º maximum field of view using 2” eyepieces in mono mode. (I am not sure, but the balancing act may be much easier for owners of the original Nighthawk Classic, as this model sports a much heavier dew shield which should better counter-balance the binos.)
The Stellarvue binoviewers have definite advantages that make them worth using. If you take the time to carefully merge and focus your images, there is less eyestrain using both eyes and the image will be sharper and with more contrast. Also, the apparent image size is larger in bino mode than it is in mono mode for the same power. This is an optical illusion, like the “big moon on the horizon” effect, but if your brain thinks it’s bigger, than it’s bigger. I estimate that I can see as much detail using 25-30% less power in bino mode. Then there is the “pseudo-3D” effect: the Moon really does appear 3-D through the binos, especially along the terminator. It would not be correct to say that these binoviewers “are as good as” a brand like Televue. But each binoviewer is individually collimated and the helical eyepiece focusers are precision machined at the Auburn facility to .001 tolerance. This makes the Stellarvue binoviewers much easier to merge and focus than other $199 brands. Basically, I can sum it all up in one sentence: IMHO the Stellarvue binoviewer is one of the best accessories you can buy that will improve the visual performance of your telescope.
The Nighthawk II is not without its own issues. First, this telescope has optics much better than your typical “Wal-Mart Wonder,” and it is priced accordingly. I do not consider this telescope overpriced, but you are going to have to cough up several more Big Bens to claim ownership of this bird. The second issue for me is the ergonomics at the focuser end. The telescope does scores points for excellent fit and finish. The supplied 2” to 1-1/4” adapter, for example, has a tapered barrel so that when you tighten down on the compression ring, it is pulled perfectly flush with the telescope thereby keeping perfect alignment. But I really feel that the screws and knobs at the focuser end are a bit cramped. The set screw for the rotating back, for example, sits directly under the RDF. Third, this telescope is an achromat, and will show color fringing around bright objects. Saturn showed no fringing that I could detect. Jupiter begins to show some fringing, as well as Venus and bright stars like Vega in Lyra. The lunar limb definitely displays false color. Users of mirror optics and apochromats may consider this a “crime of violets,” but in my opinion the excellent sharpness and total lack of astigmatism give you a dead-on focus, and this more than makes up for the achro-sitis.
Here is a list of equipment used in this review:
Stellarvue Nighthawk II
Stellarvue Binoviewer
Bogen 3001 tripod with 3130 photo head
Stellarvue M1 standard alt-az mount on Bogen 3011 tripod
Eyepieces for binoviewer:
Stellarvue FMC 23mm eyepieces (comes standard with binoviewer above)
Stellarvue FMC 15mm eyepieces
BO/TMB 9mm planetary eyepieces
Eyepieces for mono mode:
Meade 5.5mm 5000 series Plossl
BO/TMB 4mm planetary eyepiece
6mm Orthoscopic
2x Barlow
Filters: none used in this review
Conclusion: There are many fine telescope systems in the $500-1000 price range. But with some systems, you are putting most of your money into the hardware: motorized mount, goto computer, tripod, software, etc. With the Nighthawk, you are putting your money into the quality of the optical tube and the optics. I am not claiming that any of my observing accomplishments noted above are ready for the Guinness Book of World Records, but it is clear to me that the NHII has excellent performance. The Nighthawk can certainly speak for itself. In spite of all the “apo” hype currently out there, sales of this achromat, with its Stellarvue-designed lens remaining the same, continue at a brisk pace as they have for nearly ten years, which is why I call it the “Volkswagen Beetle of telescopes.” This is a telescope that will satisfy the experienced observer as well as the beginner.
David Elosser
Kernersville, NC
Click here for more about this subject. -Ed.
Funding Member