Image of the day

Captured by
Michael Scherman

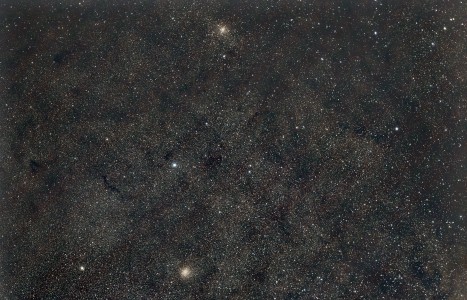
Dual Clusters near Antares

My Account

New to Astromart?

Register an account...

Need Help?

Posts Made By: Phil Barker

June 28, 2012 11:38 PM Forum: Telescope Making

testing convex sphere

Posted By Phil Barker

I've reregistered after a few years away from astromart in part to speak to fellow minded person with telescope making addictions.


One of my current projects is making a 8 inch Dall Kirkham and at the moment I've just finished polishing out the convex secondary

the scope will be around f-16 the primary is around f-4.5 and the secondary is a 2.5 inch pyrex blank purchased from willmen bell a few years back.

I decided to stick with a Dall kirk because the correction is still reasonable even with 2 inch eyepieces with these specs. Around the same coma as a f-8 newt in terms of distance in mm from the centre of the field obviously not field size with the longer f ratio.

Also the mirrors are easier to make and I back myself to make an f-4.5 elipse of around -.65 given I've now done around 20 parabolas up to 18 inch f-4.8.

Re the convex sphere I had a largely unseccussful go at a mock up interference tester using the concave as a reference but a friend told me to try fine grinding and polishing the back and testing from behind with a monochromatic light source ronchi and knife edge if possible.

After polishing the back and the convex sphere I tried this and found I had a very poor surface rough and with a hole in the centre and turned up edge.

I've now done some careful work smoothing the surface regularly pressing etc and using a ronchi then a knife edge with a green led lightsource I appear to have a very good sphere. I remade the polishing tool and am using thick medium hardness pitch. I realise its possibly not as sensitive as an interference test although this relies on the concave being accurate also.

Has anyone else tried this to me it really does appear to be a sound way of testing a convex sphere?


July 19, 2012 02:47 PM Forum: Telescope Making

surplusshed 127/1200 lens

Posted By Phil Barker

My brother secured me a 127/1200 mm surplus shed lens which I was able to first light this week.

The lens came in a metal adjustable push pull cell a nice feature.

It looks like it has been removed from a tube so maybe was a second for some reason. I mounted it in a homemade PVC tube with a nice gso focuser baffles etc etc. I'm using it on a SkyWatcher HEQ5 mount.


Looking at the lens it looked like something was up with the coatings. A non centred circular pattern was visible. I wasn't too worried about this and put it in the tube and tried looking at a 1st magnitude star. I was horrified with what I saw and my heart sank as quite clearly a large non centred zone clearly related to the issue above was visible on each side of focus and seemed to be causing ghosting around objects in focus.

I removed the lens seperated the elements cleaned reshimed the gap to see the possible coating flaw mentioned earlier was completly gone.

Looks like R2 and R3 were tounching and the shims initially in there weren't doing there job.

I retested the lens and it turns out to be rather good with no trace of the circular zones mentioned earlier in the star test.

Antares split at 130 X and Saturn was good at 190 X. I noticed at 190 X with barlow a bit of violet around Saturn barely noticeable and similar to a 6 inch f-12 D & G a friend owns. Barlows do introduce a bit of false colour with an achromat I may need to get a triplet barlow.

In focus at 190 X on a bright star overhead and that lovely lean airy disc typical of a good refractor was clearly visible.

This lens turns out to be a bargin and I'm already planning to get a decent 4-5mm eyepiece to exploit the lenses potential. I won't be buying a CA filter as frankly it isn't too bad its there and I can cope with it.

Made me think perhaps it was a second and rejected because of the initial flaw I found. The flint lens has some revealing numbers around the outside in pencil showing it was tested for wedge.


July 21, 2012 04:42 AM Forum: Refractors

surplusnshed 127/1200 lens

Posted By Phil Barker

My brother secured me a 127/1200 mm surplus shed lens which I was able to first light this week.

The lens came in a metal adjustable push pull cell a nice feature.

It looks like it has been removed from a tube so maybe was a second for some reason. I mounted it in a homemade PVC tube with a nice gso focuser baffles etc etc. I'm using it on a SkyWatcher HEQ5 mount.


Looking at the lens it looked like something was up with the coatings. A non centred circular pattern was visible. I wasn't too worried about this and put it in the tube and tried looking at a 1st magnitude star. I was horrified with what I saw and my heart sank as quite clearly a large non centred zone clearly related to the issue above was visible on each side of focus and seemed to be causing ghosting around objects in focus.

I removed the lens seperated the elements cleaned reshimed the gap to see the possible coating flaw mentioned earlier was completly gone.

Looks like R2 and R3 were tounching and the shims initially in there weren't doing there job.

I retested the lens and it turns out to be rather good with no trace of the circular zones mentioned earlier in the star test.

Antares split at 130 X and Saturn was good at 190 X. I noticed at 190 X with barlow a bit of violet around Saturn barely noticeable and similar to a 6 inch f-12 D & G a friend owns. Barlows do introduce a bit of false colour with an achromat I may need to get a triplet barlow.

In focus at 190 X on a bright star overhead and that lovely lean airy disc typical of a good refractor was clearly visible.

This lens turns out to be a bargin and I'm already planning to get a decent 4-5mm eyepiece to exploit the lenses potential. I won't be buying a CA filter as frankly it isn't too bad its there and I can cope with it.

Made me think perhaps it was a second and rejected because of the initial flaw I found. The flint lens has some revealing numbers around the outside in pencil showing it was tested for wedge.


November 3, 2012 01:57 AM Forum: Telescope Making

how I make a pitch lap

Posted By Phil Barker

A few years ago i got hold of a large quantity of rosin or pine resin.

I make up pitch by combining with stockholme tar which is used for dehorning cattle believe it or not.

A standard brew is a 7/1 ratio which I heated to melting point stirred and then put into little casts lined with foil.

I then end up with what looks like blocks of toffee which I wrap in tinfoil and store in a container. They can last for years in a cool place.

I take care to ensure they are the same thickness around 5-6mm.

I simply heat a knife over a candle and and cut them squares which are placed on a tool to form a lap.

I usually make a slightly softer brew for figuring tools which are subdiameter.

Pitch needs to be sealed and tends to harden is exposed to the air from my experience. By wrapping in foil and keeping in a sealed tin in a cool place it seems to stay fresh.


March 2, 2013 12:26 AM Forum: Telescope Making

lithrow 5.8 inch f-15

Posted By Phil Barker

I'm currently in the process of grinding a 5.8 inch f-15 lithrow lens

interesting history re this project it was going to be made by the late Garry Nankivell a famous professional telescope maker here in New Zealand for the late Harry Williams who also died a few years back well into his 90's.

It had been worked out using Zemax and I have the documents about it
Crown R1=895mm ROC R2=895mm ROC 17.145mm central thickness
Flint R3=895mm ROC R4=38500mm ROC 10.15 central thickness

Well crown is up to 280 grit and Saggitas within .05mm of desired mark.

I'm making R1 with seperate tool which is then turned to R2

R3 has its own tile tool as does R4 basically the flat back of a pyrex mirror I figured and havent coated yet.

All going along nicely I have a very good edge/centre thickness tester and spherometer I made myself.

Edge thickness is within around 1/100th of 1mm on the crown under desired accuracy.

I am making this because of the history of the blanks not to mention the very reasonably cost incurred. I am aware the lithrow will throw up ghost images and noticed on the inside of one of the blanks it had cementable?
Now I've dribbled on a bit sorry about that here is the question.

Can I cement this lens without it negatively affecting the images.

thanks in advance

Phil Barker


April 5, 2013 05:06 PM Forum: Telescope Making

fine grinding

Posted By Phil Barker

Over the years I've polished a few mirrors and the subject of fine grinding and ensuring you have close to a spherical figure before polishing has perplexed me a lot.

I have a bit of a theory about to get it right and basically when I get down to 25 micron down I fine grind for around an hour then do a test with a permanent marker.

I draw a grid pattern and then apply some 25 micron paste and move the mirror in different directions to work out of the figure is spherical.

If its not in contact in the middle the solution is to use the tool on top and test after some work and then work out if its closer to a sphere.

I then look for pits using the sun. I need glasses nowadays to do this correctly but this very effectively shows up any pits from a previous grade of abrasive. These must be removed before I go to the next stage.

Once I have good contact and I'm free of previous pits I go to 9 micron. This is a big step and I usually do 2 hours with this repeating the process above. I also use the sun or a bright filament of a lightbuld on an angle to see if the surface if even from centre to the edge.

I've noticed for example if the centre if not in good contact as shown by the sharpie I can easily see that the image of the filament fades out in the centre compared to the rest of the surface.

Good contact,checking the reflection on an angle and looking for pits always means I know I can confidently go to the next grade. I usually finish with 3 micron and have successfully gone from 9 to 3 using this technique.

At 3 micron If I have good contact no previous pits and the view on an angle is good I can be confident polishing will go well.

In the past I've seen things like greyness in the centre or edge and its because I havent had good contact. Grinding removes glass a lot faster than polishing and sometimes its better to bite the bullet and regrind. I find that I usually have to go back to 15 micron or 25 to ensure I have ground out any greyness and then follow the process of ensuring I have a sphere described above.

I'd be interested in any thoughts about this and if others agree or not. Presently I'm doing a crown element for a refractor and on 5 micron on R2.


June 26, 2013 09:49 PM Forum: Equipment Talk

rejuvinating an astroscan

Posted By Phil Barker

I've owned an astroscan now for 32 years. To say its had a lot of use is a big understatement.

To be honest I always thought the optics average collimation is a whisker out and recently it has gone downhill.

I removed the primary and front window with secondary and when I looked at how it is set up the foam behind the primary wasn't pushing it against the metal ring its meant to fit against and was adjustable.

I replaced the foam but in the meantime foucault tested the primary and was stunned to see a smooth beautiful parabola better than 1/10tyh wave p-v.

I then tried putting in secondary and window but collimation was still out slightly and images seemed to go downhill over 60 times as before.

I decided to try using an adjustable spider and secondary and glued this into place taking the window out of the picture as well. The secondary is an enhanced aluminium 1/10th wave Newport one I had lying around.

To say I have an improvement is an understatement 130 times is sharp and crisp on Saturn and collimation is much better.

I also notice an improvement in brightness especially on Omega Centauru which just starts to break into stars now whereas it never did in its original format.
This could be because its now collimated I suppose.

I do wonder how flat the optical window and original secondary are also and may try and test this at some stage.

Astroscans in my opinion are the best quick look scope.

I own scopes up to 17.5 inches in aperture but there is nothing like a quick look in an astroscan.

January 21, 2003 08:14 AM Forum: Equipment Talk

Re: Observatory Fire

Posted By Phil Barker

We are getting a lot of TV coverage here (New Zealand)to see that Oddie scope which was a national treasure for Australia in terms of history destroyed is tragic.

It will set Astronomy back a few years in Australia make no mistake about it.


January 21, 2003 08:19 AM Forum: Deep Sky Observing

Omega Centaurii from 38 north

Posted By Phil Barker

Kim

We love doing the same with M31 in the south(I'm 43 south)

In November we get a sneaky peak of it just from this declination. Must be quite a site when overhead.

I prefer 47 Tuk to Omega although for shear size Omega can't be beat. Words can't describe what Tuk looked like through a 20 inch telescope I had the pleasure to use recently.

Its incredibly dense in the centre smaller than Omega but the stars are slightly brighter a fantastic spectacle.
o

January 25, 2003 08:33 AM Forum: Antique/Classic/Vintage Optical Instruments

6" f-13 refractor

Posted By Phil Barker

Carl Zeiss Jena is carl zeiss made in jena and mostly under contract from what I understand.

I suspect its the company's own work not made under contract.

I have a german friend (who speaks very poor engish) and I will ask him. He's visiting New Zealand next week from what I understand.

Very keen astronomer he owns a zeiss as100/1000 made in the 60's and lamented the end of Zeiss making telescopes something he saw as a national tradegy.

You might also want to ask my brother Kevin at
[email protected] he's a zeiss collecter.